Part 3: Issuing Bank ID cards
Description of the steps to enroll a new user to the system for issuing a Bank ID card
Steps to enroll a new user to the system for issuing a Bank ID card
- When Bank ID Card is issued, a person applying for the Bank ID provides his/her information, which is then verified either by checking all details from an existing ID document (NID, Passport) or the details are verified by an Authorized Voucher (e.g. Ward Counsellor) affirming the identity of the applicant.
- Start by checking the user’s hands are clean and dry. If they are not, ask the person to wash their hands and dry them carefully before continuing. Clean hands are needed for reliable fingerprints.
- Smokers, especially, should wash their hands with soap and water
- Advice users to avoid hand lotion, sun-screen and liniments on the day before they are enrolled
- Ask if the applicant is enrolling for the first time or if they have had Bank ID before. It is very important to select the correct option “First card” or “Replace lost card”:
- Enrollment works only when correct option “First card” or “Replace lost card” is selected for the user
- If the First Card is incorrectly selected for an applicant who has had Bank ID before, both the old and new card are revoked
- If the Replace Lost Card is incorrectly selected for an applicant who has never had Bank ID before, the Replacement Card will be revoked
- When issuing the first card for the applicant, begin by clearly reading and explaining how the applicant’s data is going to be used and proceed only when the applicant has understood the data usage and given his/her consent to store and process their data
- Ask the applicant if he/she has an existing ID document such as NID or passport?
- If the applicant has existing ID document, type in identity details exactly how they are written in the document
- If the applicant does not have existing ID document, ask identity details from the application and ask the applicant to check they get correctly typed in
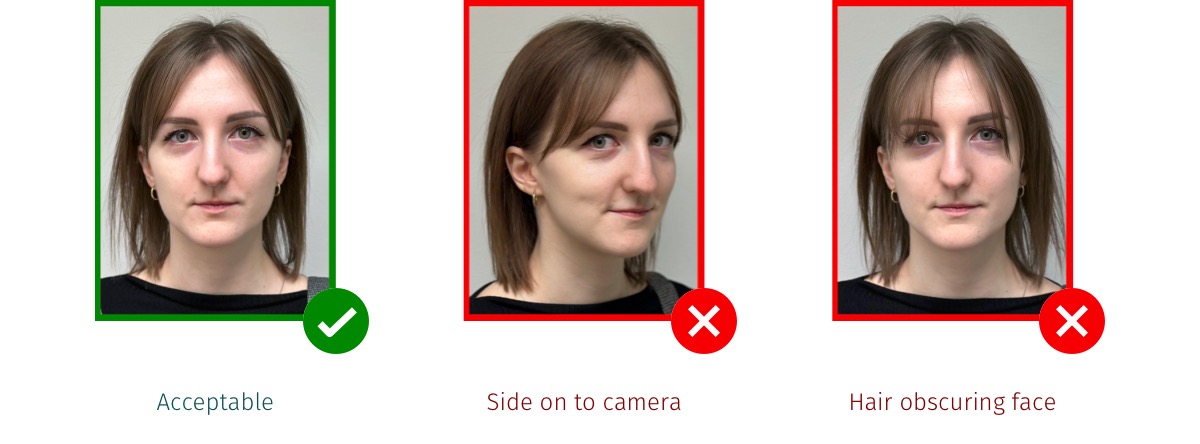
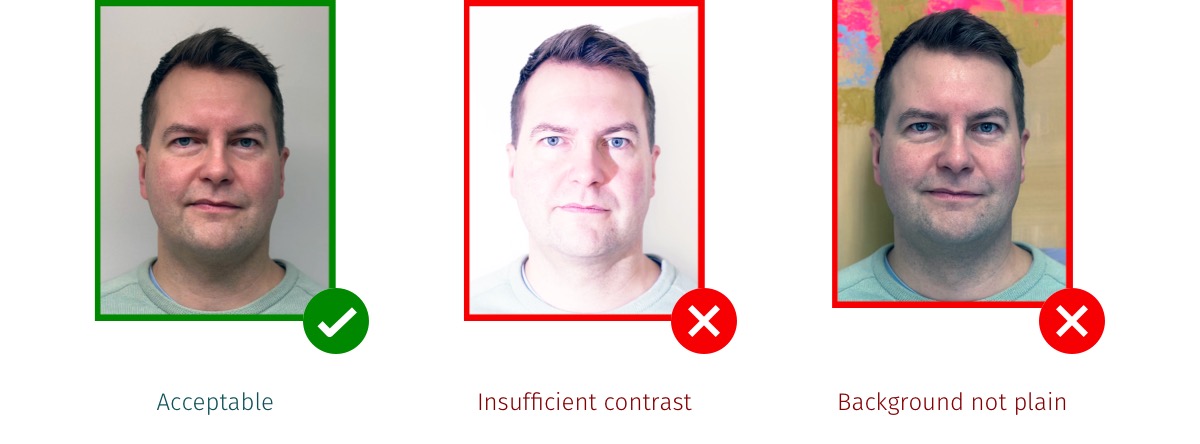
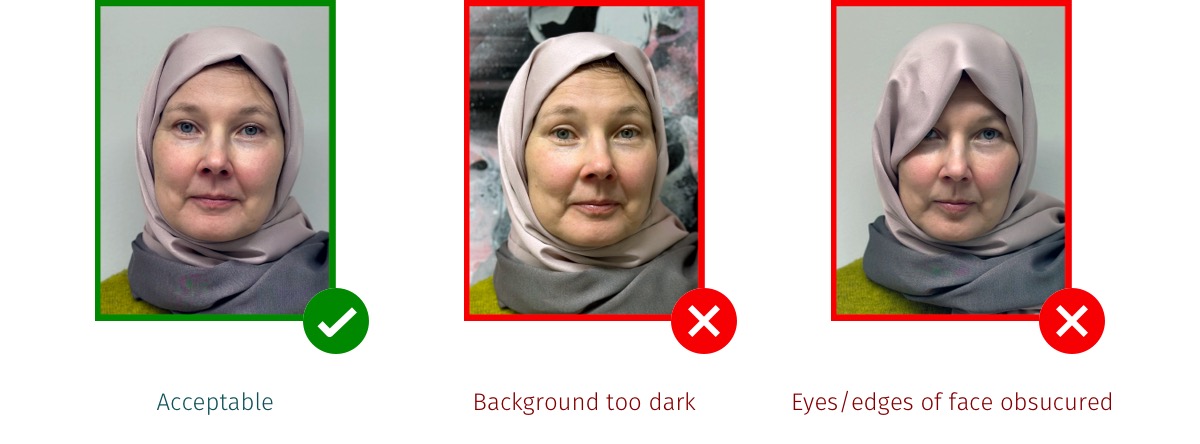
- Taking photo
- Clear, focused image with no 'red eye'
- Plain background that contrasts with the face
- Uniform lighting (no shadows or reflections), with appropriate brightness and contrast to show natural skin tone
- Face centred and looking at the camera straight on; not tilted in any direction
- Hair off face, so that the edges of the face are visible
- Eyes open, mouth closed
- Neutral expression (not smiling, laughing or frowning)


- Scanning fingerprints
- Check again the user’s hands are clean and dry. If they are not, ask the person to wash their hands and dry them carefully before continuing.
- Scan fingers exactly in the order guided by the application. Every finger needs to be scanned successfully twice.
- Position Finger Correctly:
- Place finger flat on the sensor, the finger must not be tilted in any direction
- The arches, loops and whorls that distinguish prints from others’ are in the pad of your finger, not the tip
- Position fingers on the scanner the same way each time
- Apply light pressure — pressing too hard can distort the ridges in the skin
- After each finger has been successfully scanned, a picture of the fingerprint appears. Check that arches, loops and whorls are clearly visible in the picture - if not, re-scan the same finger
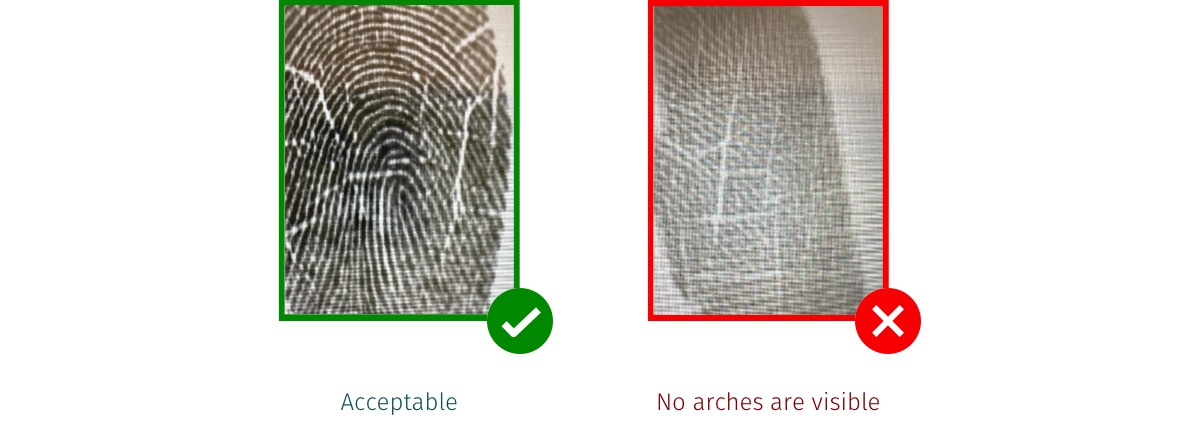
- Always scan all 10 fingers. If the fingerprint scanning fails to match the finger several times, check that the finger is positioned flat on the sensor, clean the finger and try again. A finger may be skipped only if reading the finger is impossible, but skipping fingers must be avoided by all means. A minimum of 8 fingers must be scanned successfully for the enrollment to proceed.
- Verifying user information
- Ask the applicant to check their information is input correctly
- If the applicant has an ID document, check the correctness of the information from the ID document. Only when information is exactly as in the document, the agent may proceed signing the information with his/her PIN code and card
- If the applicant does not have an ID document, ask the voucher to check and confirm the person's information is correct. Once confirmed, the voucher signs the information with his/her PIN code and card. Agents must not sign information for applicants who don’t have an ID document.
- Ask the applicant to check their information is input correctly
- Issue new Bank ID card
- After applicants' information is verified and signed, place a new card to the NFC sensor to transfer data and to issue a new Bank ID card
- Read the new card to ensure the newly issued card works properly